Sunday 19 February 2006

Beads Project - the ones I'm keeping

I tried to make some larger beads as well for this swap but didn't like them nearly as much as the first set. I'm going to use them for embellishing journals. I did learn things as a result of this project. I can use my tiny engraver as a sanding and buffing tool for PC. That was a great discovery, the ends of the beads are much flatter than they would be otherwise. If you roll your beads with a cocktail stick already inside, the hole gets bigger but the ends go out of shape as well. You can use alcohol and acrylic inks on top of the clay. Wrapping clay with clay is difficult.


And these are some close ups


Beads Project - the ones I'm sending off

I'm also swapping some beads this month. We only had to swap 6 beads, and I made mine too small so my partner is receiving more to make up for them. I was please with the final results - they feel and sound like wood when you bounce them up and down in your hand.


This is a close up of one of the beads (the scanner did not do general justice).

And here they are together before Buddy goes to the States

The final computer buddy

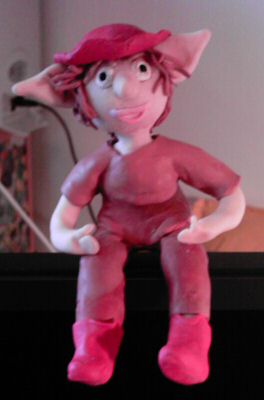
So, I set about making another one. It was supposed to be a fairy, but I wasn't going to do petals for the clothes. I made this one without a "pattern". I had problems with the flesh clay, it was black. The tip from the group is wash your hands well before starting, and keep baby wipes to hand. I covered most of it with clothes.

Any way, the nose was large but satisfactory, so the fairy turned into a male elf. The ears making it elf like rather than boy like. A friend at work said that one of the problems with the fairy was that it didn't have lips, so this one does and I am happier with that bit. I also used paint inside the mouth and around the lips. I broke a thumb off in the final stages, so pulled the hands off and made them again with what was left behind. I think the proportions are better as a result, so some accidents are good accidents.

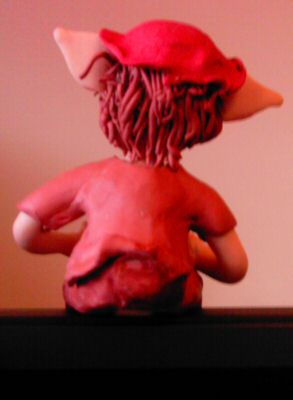
I tried sanding bits but he now has a hole in the seat of his trousers so I decided to stop. I've had tips from the group about finger prints, and over squashing, cooking, dirt, hairs. All in all, it has been a good learning process and as a novice, I am comfortable with what I have done but I do want to get a lot, lot better.

What the first one should have looked like

The idea for the fairy came from Maureen Carlson's clay characters for kids book. You can see the fairy on the front cover.

The first attempt

This is a picture of the first buddy I made. It took my five hours and I wasn't very pleased with it because the face was wizened rather than child like, and then after all that, I burned it in the oven. Mind you, I wasn't too distressed because it made the decision for me, I was definately not going to share something which was so burned that the clay was black and melted. I wrote to the group and got some ideas on how to stop it from happening again (i.e. the burning, not the wizening).

Introduction to this blog

I've been dabbling a bit with polymer clay for a couple of years now and decided I wanted to join a group for swapping and also learning and improving. The group I chose was PolyWannaClay at yahoo. I'm starting this blog because I want to show some computer buddies I have been making for the group's current spot.