Just read the story of the amulet by E. Nesbit. The take takes place in 1905 and I presume was written at around that time. It is in a similar vein to the lion the witch and the wardrobe but without the religious undertones. Although it is a child's book I certainly enjoyed it. I read another book about an amulet as a child in the early 70s but can't remember which one, does anybody have any ideas about what it might have been?
Tuesday, 20 September 2011
Sunday, 18 September 2011
year of wonders
I've just finished reading 'year of wonders' by Geraldine Brooks. It is set in Derbyshire in the plague and is fascinating. The population was decimated to the extent of an apocalypse and the survivors had great challenges to surmount. Our landscape would be very different today had it not been for the plague. The author was a war correspondent and this is her first novel. It is very well researched and I recommend it.
Sunday, 28 August 2011
Dyeing in a bag
Last weekend I went to my friend Aggie's studio to some dying in plastic bags based on Helen Deighan's book Dyeing in Plastic Bags: No Mess, No Fuss, Just Great Colours. I've been wanting to do this for ages and was surprised at how easy it was.

I dyed several pieces of fabrics, a T-Shirt and a couple of canvas bags. I was going to print on the canvas bags but my experiments were not sufficiently crisp for me to want to do it on the bags or t-shirt. I'll have to think of some other form of completing the decoration.
 | |
| Soaking up the Dye |
 |
| Soaking up more dye overnight |
 |
| Drying in the sun |
 | |
| Trying out some stamping before stamping the dyed fabrics |

 | ||
| Recording the mixtures |
I dyed several pieces of fabrics, a T-Shirt and a couple of canvas bags. I was going to print on the canvas bags but my experiments were not sufficiently crisp for me to want to do it on the bags or t-shirt. I'll have to think of some other form of completing the decoration.
Saturday, 6 August 2011
THe Brilliance of You tube and a necklace
I have a beadalon knotting tool which helps you to make perfect knots when making jewellery. I tried using it yesterday, with mixed success (and I did RTFM). I watched a you tube video about it last night. I think the video is different to the paper instructions and it looks so easy. I haven't had a go again today to test the theory. You Tube is a wonderful place to find step by step instructions on how to do things. People are so generous in sharing their knowledge.
I also watched a few videos about the coiling gizmo and learned how to open and close split rings - you don't pull them from right and left to split the ring, you do it forwards and backwards which means they go back into the proper place when you have finished. I also saw a video which included a section on making wire which has a hoop at both ends (I don't know the name for them) and discovered that I had been doing it completely wrong. If you are interested, look at 7 minutes 35 seconds on this video.
Using my new found knowledge, today I created a necklace from the Sculpey beads made yesterday. I don't have making the wire with hoops at both ends sussed yet (I have a measuring problem), but this necklace is a lot better than the last one I made using the same technique. I have ordered a pair of jump ring closing pliers which I want to use to make the jump rings on this necklace oval rather than round. This means that the rings will be less likely to open. Click on the image to see more detail.

Beads
I have a bead roller which helps you to make perfect round and oval beads. I did re-learn, RTFM (Read the ... Manual). The bead roller instructions tell you how to cut the perfect size clay to put in the roller and we had at least 3 goes before I realised I had missed an instruction or two.
We made sculpey marbelled beads and also tried it out on Model Magic which is an air drying clay. (Good job I took photos of the packaging, this was for Mandi's benefit but I thought I had used Eberhard Faber PlastLight and had written several sentences about it in the draft version of this blog post).
Mandi did say that these beads were more round than the ones she had hand moulded because the new ones escape. I was also able to try out the baking stands that I made in the pottery class a couple of years ago. When I first made them, I didn't go to the class to pick them up and the teacher nearly threw them out because they looked useless. They are so, so useful! You can use a potato instead if you wish though.


Book Thongs
Mandi belongs to the Costa Brava branch of the U3A (University of the Third Age). The branch are celebrating their 30th birthday this year. The craft group have a project to create book thongs. Mandi made 2 or 3 before leaving Spain for the U.K. but needed 10 all together. So, we had great fun creating them from my stash of threads and beads. We even made our own cords for a few of them using the Babyliss Crazy Braid. I bought my crazy braid from E bay and it is a lot cheaper than buying a conventional cord maker.

Our favourite is the first one from the left, followed by the second from the right. I pick up cheap jewellery when I can, and this was used for the favourite. Click on the image to see the thongs in more detail.


Our favourite is the first one from the left, followed by the second from the right. I pick up cheap jewellery when I can, and this was used for the favourite. Click on the image to see the thongs in more detail.

Rub-Onz Transfer Film and DECADry Creative Plastic
Mandi and I visited Hobby Craft in Gloucester for some art supplies, particularly for her. They are very expensive in Spain. Whilst there, I spotted some Rub-Onz Transfer Film. You create your own rub-ons by printing on the sheets using an ink jet printer. We didn't have time to work on a design (we were trying to use the lap top as little as possible due to an electrical crisis in the Stenning household). Any way, we created a sheet of hearts which were OK. I would like to try it again when I have a purpose for it.
We also played with the Creative Plastic. This is Shrink Plastic or Shrinkies for an ink jet printer. I cooked them in a fan oven (the craft electrical oven being out of bounds due to the electricity situation) and burned them. However, we did get to see the general effect. Also, I printed the back with a solid colour, it didn't dry and smeared every where, so if you decide to give it a go, don't do what I did, try using a half tone.
Before and After Baking


Wye Valley Spa and Deer in the Forest of Dean
We spend Wednesday at the Wye Valley Spa. This is a recent find, as a result of a Groupon campaign. It is only 15 minutes from our house, which is remarkable given that we are in the middle of no where. I have photos, but would not be popular with my mates if I posted them into my blog! We are all in swimming costumes and of a certain age. I made the booking in late May, we were very lucky with the weather. It was sunny a lot of the time and we all got to swim in the outside pool.
On the way home we were very lucky and saw two stags. Mandi managed to get a couple of photos through the car window. I could have got closer ones had I not been a clutz and dropped the camera. Click on the picture to see it full size.

On the way home we were very lucky and saw two stags. Mandi managed to get a couple of photos through the car window. I could have got closer ones had I not been a clutz and dropped the camera. Click on the picture to see it full size.

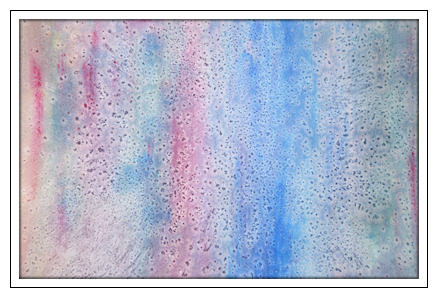
Painting with Bubbles and Salt Backgrounds

Mandi showed us how to create the above. Masking fluid was drawn/painted on to the paper. Washes of acrylic paint (it might have been water colour) were laid down, the stripes were blended to reduce the harsh lines. We then dabbed very diluted blobs of paint onto the picture and blew the blobs through a straw. Different blowing techniques move the paint in different ways. The next steps were to remove the masking fluid and add and blow more blobs, this time with ink.
I find I am mean with paint, so rather than throw it away, we put washes of it onto paper and added what was supposed to be fine sea salt. It was rather coarse (I think it had got damp in the cupboard). I will use them as backgrounds. This is my effort.
We all decided that we are lucky to be living in this time (and I suppose in our culture). Our forbears had to spend so much effort in staying alive that they didn't have the opportunity to have the fun that we can have. I can't imagine what the future will be like though, things have changed so much in my lifetime; I was born in 1958 and have just seen a face-book post from a colleague of mine who is the same age:
and boy does it ring true!
Fun Foam printing with my friends
My ex-colleague Mandi who lives in Spain has spent the week crafting with me. Our friend Ann came along as well for crafting on Tuesday and a visit to a health spa on Wednesday.
I was given an excellent book on printing for Christmas: "Print and Stamp 52 ideas for handmade, upcycled print tools" by Traci Bunkers. We spent Tuesday morning creating stamping tools from Fun Foam. Ann made a complicated roller stamp, inspired by one of those in book. Mandi then took Ann's off cuts, amended them a bit, and made her own stamp. Clicking on the images will show you a larger image and you will be able to see the detail of the roller.


Ann was inspired yet again and made the stamp below.

We thought about using them on T-shirts or a bag, but didn't have time.
Tammy's Digital Dreams Workshop - Week 5

Tammy's Digital Dreams Workshop - Week 4

This is work in progress. I do like dodging and burning in Photo-shop. You will see that she is standing at a strange angle! I have fixed this by the time I got to the final piece.

Tammy's Digital Dreams Workshop - Week 2

In January this year, we had a "works" outing to visit ex-colleagues in L'Escala, Spain. We spend a day in Girona. Mandy and I travelled from Bristol, Kelly and Marcun travelled from Belfast, and Mandi is incumbent in L'Escala. We had a great weekend. The second week of the Digital Dreams course was about creating collages and pdf documents. I also created my own photo-shop brushes for the background.
Dave took the photo (thanks Dave). I tried to squeeze him into the collage but nothing worked. We should have accosted a stranger and asked them to take a photo of us all.
Tammy's Digital Dreams Workshop - Week 1

The Digital Dreams Workshop has now finished. During week 1 we learned how to use brushes to make a background, along with text and using the dodge and burn tools to turn a flat circle into a sphere. This is certainly easier than using "real" paint! The course is based on Photo-shop CS but I did it successfully with Photo-shop Elements 9.
Sunday, 22 May 2011
Tammy's Digital Dreams Workshop
I've just signed up for Tammy's Digital Dreams Workshop on willowing.ning.com.

I've done several mixed media painting courses with Tammy, she is an excellent teacher. She provides you with videos to keep. Using videos works for me, you can pause them and rewind them. I have found that I am much more pleased with my paintings since I started taking Tammy's workshops.
This workshop is about using photoshop to create portraits. It is designed for "full blown" PS, but should be adaptable to elements, which is what I will be using.
Sunday, 20 March 2011
Trying out the ad free version of blogger droid
This is the first time I have spent any swedish kroner. The internet makes it so (too?) easy. I have been reading lots of swedish books recently and I do fancy visiting one day. Camilla Lackberg is the latest along with Henning Mankell.
I spent kroner because I bought the ad free version of blogger droid to send blog posts from my phone. It works a treat and I hope that Anders Hedstrom is making a mint.
I spent kroner because I bought the ad free version of blogger droid to send blog posts from my phone. It works a treat and I hope that Anders Hedstrom is making a mint.
Monday, 14 March 2011
Swype beta
I have an android phone. I was asked the other day if I liked the slidey way of entering text. I thought I had tried it out before and didn't use it, so I tried to find it again so I could report back. I was unsuccessful. I spent the weekend with an android owner who told me about swype. I find it a much quicker way of entering text. So, if you have an android phone, you might like to give it a try. Search for swype beta.
Published with Blogger-droid v1.6.7
Thursday, 10 March 2011
Goddess
Here she is - nearly finished. I want to add more white paint to the dress but can't do that for a bit because I am either away or have guests for the next 3 weekends.


Saturday, 5 March 2011
Goddess
I'm taking Tammy's Magical Mythical Makings (M3) course. We do three pictures during the course. I am very behind and still only in the middle of the first! It is a Goddess in the style of Klimt. The course is closed now, but Tammy will be making it available on DVD shortly.
The picture is being painted on a 24 inch by 30 inch canvas.
The initial sketch

First layer of paint - the eyes are too small.

I had a problem sorting the eyes out. In the end, I drew one to my satisfaction, traced it and copied it to the other side. Even after all that, they weren't both the same size. Painting them afterwards was tricky as well. I found I could do it more easily if they were on a straight line, hence the position of the canvas.

Here, her dress has been completed in the style of Klimt.

A gold background has been painted. I use Reeves paint, it is fabulously gold.

This is where she is now. I have to wait for the structure gel to dry before I can progress further. Tammy uses Texture gel. Even though my pot lid was so tight that I had to get DH to open it, it was still dry. I haven't been able to find out how to regenerate it. Luckily I had some structure gel which is much softer but still can be used to create peaks.

Monday, 10 January 2011
The Art of Stitching on Metal
Another book I received for Christmas was The Art of Stitching on Metal by Ann Parr. Another success. I made this pendant. I love the way that it looks as if it is made of molten metal. I tried stitching on different metals, but this one had the best effect. I'm not sure what it is, but it is a very malleable silver like metal. I wish I did know what it was because I want to be able to make more.


Pearl Competition
I am entering an embroidery competition. We were given a pack with three small pieces of silk and 3 pearl beads. This is to celebrate the 30th anniversary of our guild. The instructions are to use at least one piece of silk and one bead. I decided to create a dragon using a copyright dover image.
I did a few trial pieces on hessian to check that the design was OK. The first one was done in white but with different stitches. I didn't feel that there was enough contrast in the texture so decided to make a coloured dragon. The one on the top right was not completed because the machine decided that it couldn't cope with stitching through the layers. I think the dark orange stitching was too small.

I stitched a bottom layer of a weave pattern. The machine got jammed up in the middle of the stitching (bottom right) and no matter what I did, it would not start again. I was worried that it was broken. Given that this was still a trial, I started again. The one on the bottom right is the final sample. The colour in the photo is very orange but in real life it is a bright yellow.
The image below is of the final piece, although it needs pressing and framing, I am hoping that I will be able to get rid of the puckers. The background is stitched in cream embroidery thread and the detail is in gold metallic thread. Unfortunately, metallic thread always looks poor in my photos. It looks very glamorous and shiny when viewed in person. I'll post another entry when it is framed and ready for presentation.

I did a few trial pieces on hessian to check that the design was OK. The first one was done in white but with different stitches. I didn't feel that there was enough contrast in the texture so decided to make a coloured dragon. The one on the top right was not completed because the machine decided that it couldn't cope with stitching through the layers. I think the dark orange stitching was too small.
I stitched a bottom layer of a weave pattern. The machine got jammed up in the middle of the stitching (bottom right) and no matter what I did, it would not start again. I was worried that it was broken. Given that this was still a trial, I started again. The one on the bottom right is the final sample. The colour in the photo is very orange but in real life it is a bright yellow.
The image below is of the final piece, although it needs pressing and framing, I am hoping that I will be able to get rid of the puckers. The background is stitched in cream embroidery thread and the detail is in gold metallic thread. Unfortunately, metallic thread always looks poor in my photos. It looks very glamorous and shiny when viewed in person. I'll post another entry when it is framed and ready for presentation.
Print and Stamp Lab: 52 Ideas for Handmade, Upcycled Print Tools
One of the books I received for Christmas was Print and Stamp Lab: 52 Ideas for Handmade, Upcycled Print Tools by Traci Bunkers. It is a brilliant book with all sorts of ideas on making stamps. Although I had ten days away from the office, most of those days were too cold for me to want to be in the studio. I did manage one day though and made a few stamps and rollers.

I made these from some furniture wheel protectors, and got two stamps for the price of one. One is the spongy inside and the other is the harsh edged outside. I use tape on the top of my home made stamps to make them easier to pick up.

I made these from some furniture wheel protectors, and got two stamps for the price of one. One is the spongy inside and the other is the harsh edged outside. I use tape on the top of my home made stamps to make them easier to pick up.
Red Frogs
I only managed to make a gift for one person this year, that is one more person than most years. Claire had requested a red frog and I decided to put one on a T-Shirt. Not being sure of her size, I put them on two different sized t-shirts.

Subscribe to:
Posts (Atom)
